Learn Web ADI: How to Define a Web Applications Desktop Integrator
This guide demonstrates step-by-step process to define a custom Web ADI integrator that uploads data to staging tables and returns detailed error messages for failed rows.
Oracle E-Business Suite has a powerful desktop integration tool known as Oracle Web Applications Desktop Integrator (Web ADI). It provides seamless integration with desktop tools like Excel, Word, and Project, enabling data upload/download using familiar office applications.
Table of Contents
How to Define a Web Applications Desktop Integrator
1. Prerequisites of Web Applications Desktop Integrator
Microsoft Excel and Word Configuration for Web ADI Integration
2. Create Web Applications Desktop Integrator
4. Configure Interface Attributes
7. Microsoft Excel Settings for Upload
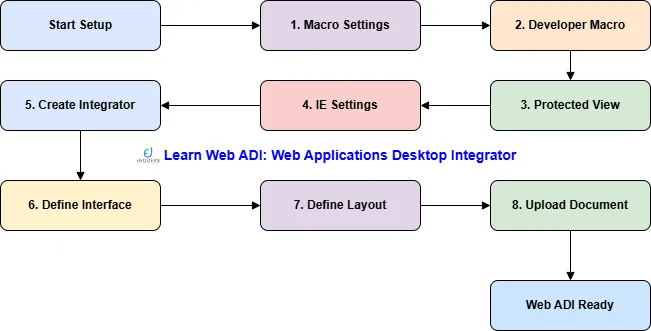
✅ Step 1. Prerequisites of Web Applications Desktop Integrator
Before creating the custom integrator, ensure you have Prepared Staging Table, Sequence, and Wrapper Procedure:
- A staging table to temporarily hold uploaded data
- A sequence to uniquely identify uploaded records
- A wrapper PL/SQL procedure to validate and insert data, returning error messages as needed
Benefits:
- Embed business validations
- Return error messages per row
- Ensure controlled data staging before final processing
👉 See Appendix A at the bottom for sample scripts
⚙️ Step 1.1 Microsoft Excel and Word Configuration for Web ADI Integration
To ensure smooth integration, configure Excel and Word using the following settings:
- Macro Settings of Web Applications Desktop Integrator
- Developer Macro Settings
- Protected View
- Internet Explorer Configuration Requirements
🧩 Step 1.1.1 Macro Settings of Web Applications Desktop Integrator
Digitally Signed Macros
- Enable profile: BNE Enable Digital Signature = Yes
- In Excel/Word: Disable all macros except digitally signed macros
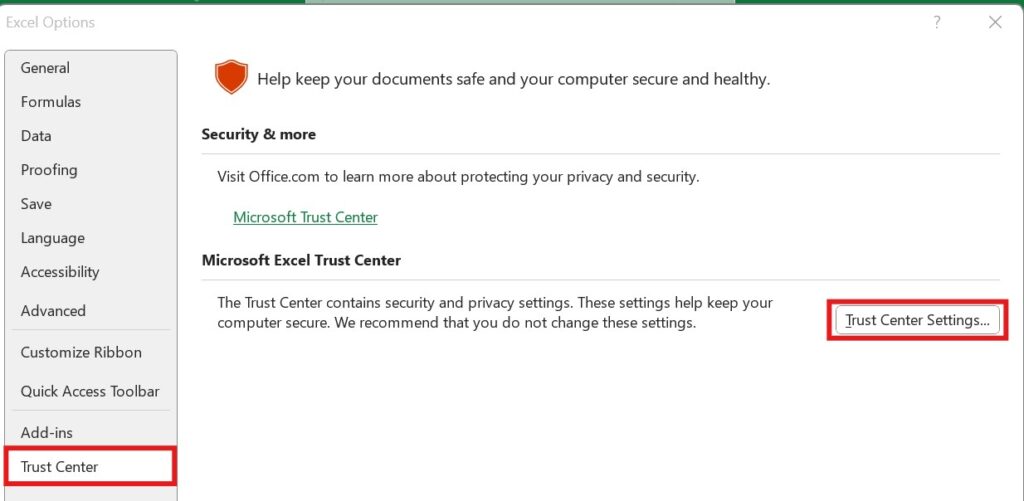
- Path: (File → More..) Options → Trust Center → Trust Center Setting… → Macro Settings
Unsigned Macros
- Excel/Word: Disable all macros with notification
- Path: Options → Trust Center → Trust Center Settings… → Macro Settings

🧪 Step 1.1.2 Developer Macro Settings
Using OOXML Standard
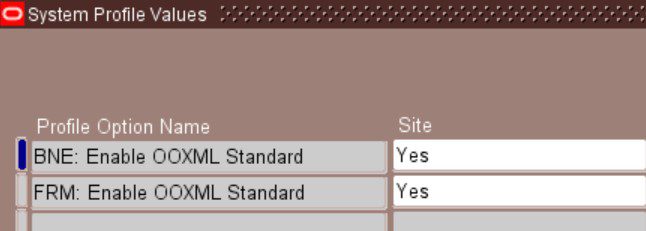
- Set the following profile options:
- BNE: Enable OOXML Standard = Yes
- FRM: Enable OOXML Standard = Yes
Without OOXML Standard
- Excel/Word: Enable Trust Access to the VBA project object model
- Path: Options → Trust Center → Trust Center Settings… → Macro Settings
Error if not set:
- Excel: Run-time error 1004: Method ‘VBProject’ of object ‘_Workbook’ failed.
- Word: Run-time error 6068: Programmatic access to Visual Basic Project is not trusted.
🛡️ Step 1.1.3 Protected View
Trusted Location (Recommended)
- Add Excel download folder to Trusted Locations
- Path: Options → Trust Center → Trust Center Settings → Trusted Locations
Disable Protected View (Optional)
- Uncheck Enable Protected View for files located in potentially unsafe locations
- Path: Options → Trust Center → Trust Center Settings → Protected View
🌐 Step 1.1.4 Internet Explorer Configuration Requirements
File Download Setting
- Enable File download
- Path: Tools → Internet Options → Security (Tab) → Custom Level → Downloads
Script Setting
- Enable: Allow Status bar updates via script
- Path: Tools → Internet Options → Security (Tab) → Custom Level → Scripting
ActiveX Controls (For 11i Only)
- Only for Web ADI version below 11i.BNE.D
- Enable or Prompt: Initialize and script Active X controls not marked as safe
🧩 Step 2. Create Web Applications Desktop Integrator
- Log into EBS with Desktop Integration Manager responsibility
- Navigate to Create Integrator
- Provide:
- Integrator Name (user-friendly)
- Internal Name (must be unique)
- Do not check Reporting Integrator
- Assign the following security rule:
- Desktop Integration – Create Document (BNE_ADI_CREATE_DOCUMENT)
- Click Next
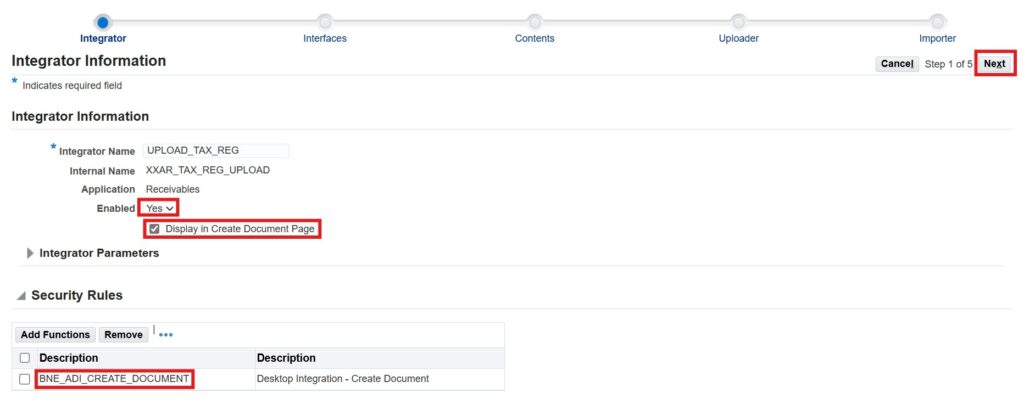
👉Don’t forget to enable “Display in Create Document Page” checkbox. If you don’t enable it you can’t see the integrator from create document page.
Step 3. Define Interface (Web Applications Desktop Integrator)
| Field | Value |
|---|---|
| Interface Name | UPLOAD_TAX_REG |
| Interface Type | XXAR_TAX_REG_UPLOAD |
| Application Name | Receivables |
| Package Name | XXAR_GET_CUST_ACCT_PKG |
| Procedure Name | MAIN |
| API REturns | FND Message Code |
✔️ Check Retrieve Error Information — enables row-level error display in Excel
Click Apply to save.
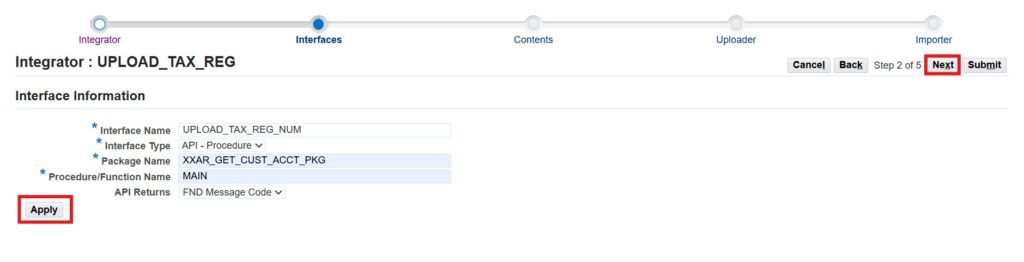

Click Next to proceed.
Step 4. Configure Interface Attributes
You can:
- Enable/Disable fields
- Set default values
- Add LOVs (List of Values)
🔧 Define LOVs
- Click Create Component
- Provide parameter names and values
- Attach the component to relevant interface attributes
- Update interface fields with LOV component
Click Next to continue (skip Content creation here).
📤 Step 5. Define Uploader of Web Applications Desktop Integrator
- Select From Template in Uploader LOV
- Click Create
- Default parameters will appear, editable as needed
- Click Next and Submit the integrator


Press “Submit” to save the Integrator
🧾 Step 6. Define Layout of Web Applications Desktop Integrator
- Go to: Desktop Integration → Define Layout
- Select your integrator and click Define Layout
- Create a new layout and configure:
- Layout Name
- Header columns
- Field positioning (Context → Line)
- Column width/order
- Click Apply

Select Integrator “UPLOAD_TAX_REG” and press “Go”

Press “Create” to create the Layout

Give Layout Name and Number of headers. Press “Next”
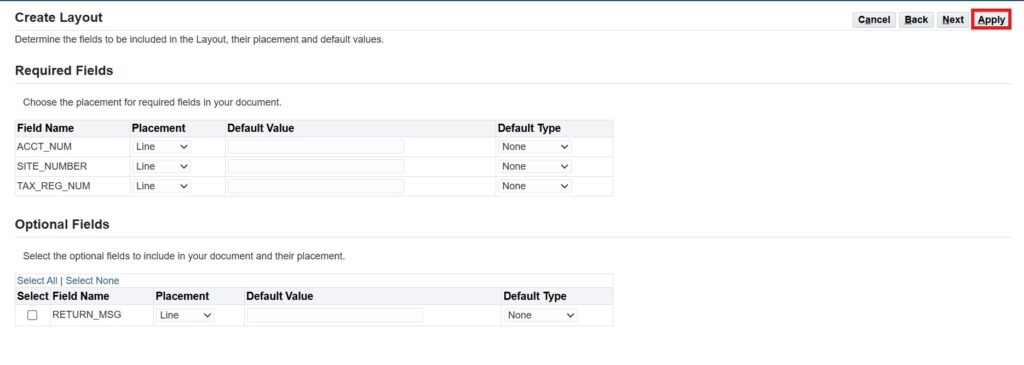
Review fields and placement (whether Line or content) of the fields. Press “Next”
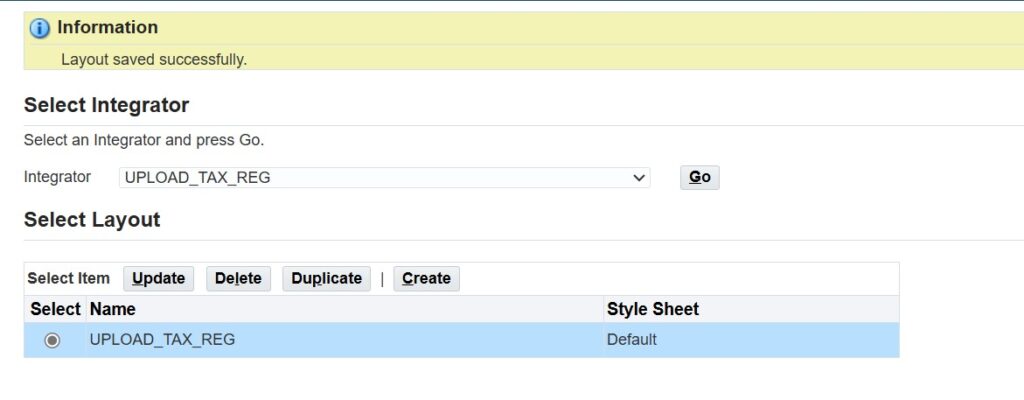
Layout will be created successfully.
🧪 Step 7. Microsoft Excel Settings for Upload
Ensure the following Excel settings are in place before creating the document:
- File → Options → Trust Center → Trust Center Settings
- ✅ Enable all macros
- ✅ Trust access to VBA project object model
- ✅ Enable data connections
- ✅ Enable automatic workbook updates
- ✅ Show message bar when ActiveX/macros blocked
📑 Step 8. Create Document
- Go to: Desktop Integration Manager → Create Document
- Select Integrator, Layout, Uploader
- Define number of rows
- Spreadsheet template downloads
- Fill data → Click Add-Ins → Oracle → Upload
Select Integrator as “UPLOAD_TAX_REG” and press “Next”

Select the Viewer as “Excel 2016” and press “Next”

Press “Create Document”
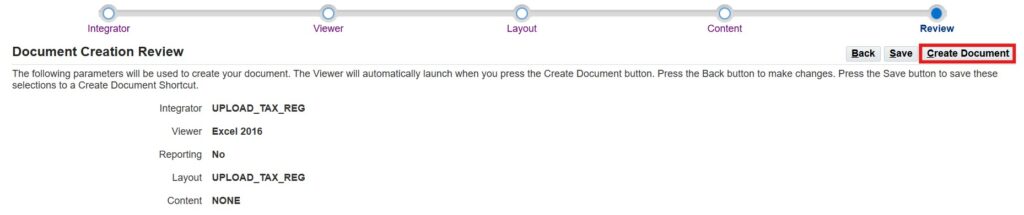
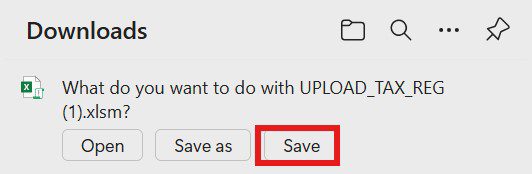
New excel file will be created. Save the excel sheet in local machine.
📑 Step 9. Fill Data and Upload Document
- Go to the Downloads folder and open “UPLOAD_TAX_REG.xlsm (Microsoft Excel Macro-Enabled Worksheet) file
- Populate the required data in the excel sheet
- Press “Upload” button in the toolbar
- Select Appropriate parameters in the new form
- Press “Upload” in the new form

The system:
- Validates entries
- Executes wrapper procedure
- Displays per-row success or error message
After validating the records all the records will be processed and message to be shown in the “Upload Page”. Also execl sheet will be updated with status.
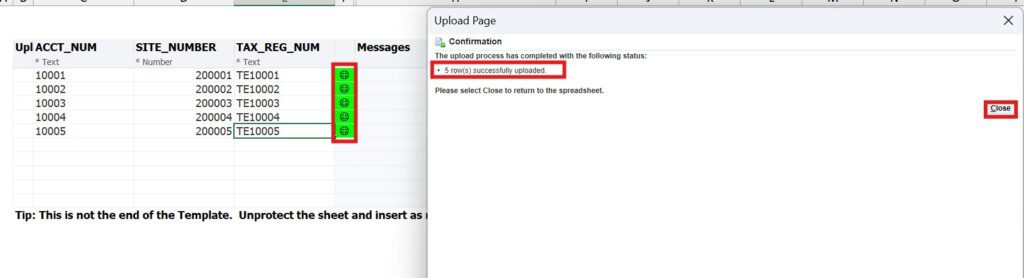
If any of the filled record has any issue appropriate error message will be shown in the form as well as in the excel sheet.
📎Appendix A
In the following bonus section you can will Oracle Web ADI Sample Pl/SQL Table and Packages. So you will be completely ready for Oracle Wen ADI (Web Applications Desktop Integrator).
-- 1. Staging Table
CREATE TABLE xxar_cust_acct_tmp (
   header_id           NUMBER GENERATED BY DEFAULT AS IDENTITY,
   account_number      VARCHAR2(30) NOT NULL,
   site_number         NUMBER NOT NULL,
   tax_registration_no VARCHAR2(50),
   process_status      VARCHAR2(10) DEFAULT 'N',
   error_message       VARCHAR2(2000),
   creation_date       DATE DEFAULT SYSDATE,
   last_updated_date   DATE DEFAULT SYSDATE,
   CONSTRAINT pk_xxar_cust_acct_tmp PRIMARY KEY (header_id)
   );


-- 2. Wrapper Package Specification
CREATE OR REPLACE PACKAGE xxar_get_cust_acct_pkg
AS
   PROCEDURE main (
      p_acct_num      IN VARCHAR2,
      p_site_number   IN NUMBER,
      p_tax_reg_num   IN VARCHAR2,
      p_return_msg    OUT VARCHAR2
   );
END xxar_get_cust_acct_pkg;
-- 2. Wrapper Package Body
CREATE OR REPLACE PACKAGE BODY xxar_get_cust_acct_pkg
AS
   PROCEDURE main (
      p_acct_num      IN VARCHAR2,
      p_site_number   IN NUMBER,
      p_tax_reg_num   IN VARCHAR2,
      p_return_msg    OUT VARCHAR2
      )
   IS
   BEGIN
      IF p_tax_reg_num IS NULL
      THEN
         p_return_msg := 'Tax Registration Number should be non empty';
         RETURN;
      END IF;
      INSERT INTO xxar_cust_acct_tmp
               (account_number, site_number, tax_registration_no)
         VALUES (p_acct_num, p_site_number, p_tax_reg_num);
      p_return_msg := 'SUCCESS';
   EXCEPTION
      WHEN OTHERS THEN
         p_return_msg := 'ERROR: ' || SQLERRM;
   END;
END xxar_get_cust_acct_pkg;Conclusion
Defining a custom Web ADI integrator in Oracle EBS empowers business users with Excel-based data upload capabilities while maintaining control and validation at the backend. By configuring Excel, Word, Internet Options, and Oracle Apps profile settings properly, you ensure a smooth and secure integration process. With a well-prepared staging environment and robust wrapper procedures, this solution becomes both scalable and maintainable—perfect for business-critical operations involving bulk data entry.