How to pip Install PySpark on Windows, Mac & Linux
Excited to explore the world of PySpark but unsure how to use pip install PySpark on Windows? Don’t worry! This step-by-step guide will make the PySpark installation process in Windows effortless, so you can get up and running with PySpark in no time.
In this guide you will know everything from downloading/installing Java, Spark, Hadoop, configure environment variables till validate the PySpark installation with one simple example. You can refer to the PySpark Tutorial if you want to explore more on PySpark.
Table of Contents
PySpark Installation Prerequisites
How to Configure PySpark on Windows
What is Spark in Python?
PySpark, the Python API for Apache Spark, empowers users to conduct real-time, large-scale data processing in distributed computing settings using Python. It offers a PySpark shell for interactive data analysis, blending Python’s user-friendliness with the robust capabilities of Apache Spark. PySpark encompasses Spark’s full suite of functionalities, including Spark SQL, DataFrames, Structured Streaming, Machine Learning (MLlib), and Spark Core, making it accessible to Python-savvy individuals for data processing and analysis of any scale.
pip install PySpark Installation Prerequisites
Before we jump into the installation of PySpark on Windows, make sure you have the following Install pip PySpark prerequisites in place:
- Python: PySpark requires Python. Ensure you have Python installed on your Windows machine. If not, download and install Python from the official website.
- Java: PySpark relies on Java, so ensure you have Java Development Kit (JDK) installed. You can download JDK from Oracle’s website.
- WinUtils: This is Windows utilities required by Hadoop and Spark.
After configuring Python and Java in local system you are ready to do the next step of pyspark install windows.
How to Configure PySpark on Windows
Now, let’s get to the heart of the matter—Configure PySpark (PySpark install windows).
Steps to Pip Install PySpark on Windows Machine:

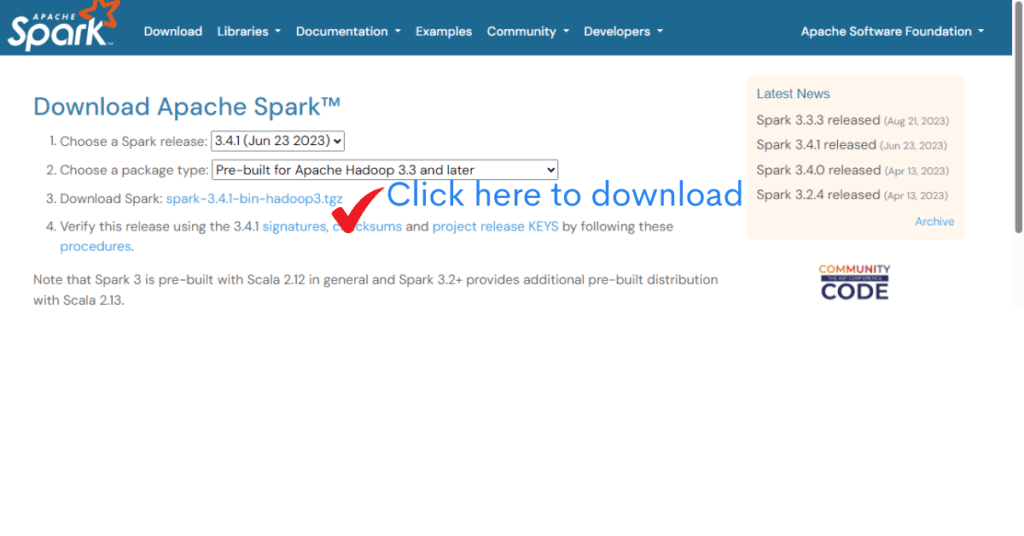
Step 1: pip Install Apache Spark in Jupyter Notebook
- Visit the official Apache Spark website (download now).
- Choose the latest stable version of Spark.
- Select “Pre-built for Apache Hadoop” and download the “Direct Download” link for your chosen version.
- Extract the downloaded .tgzfile to your preferred location
- Let’s say extracted file is in C:\Spark\spark-3.4.1-bin-hadoop3.2
- Above location to be set as SPARK_HOME
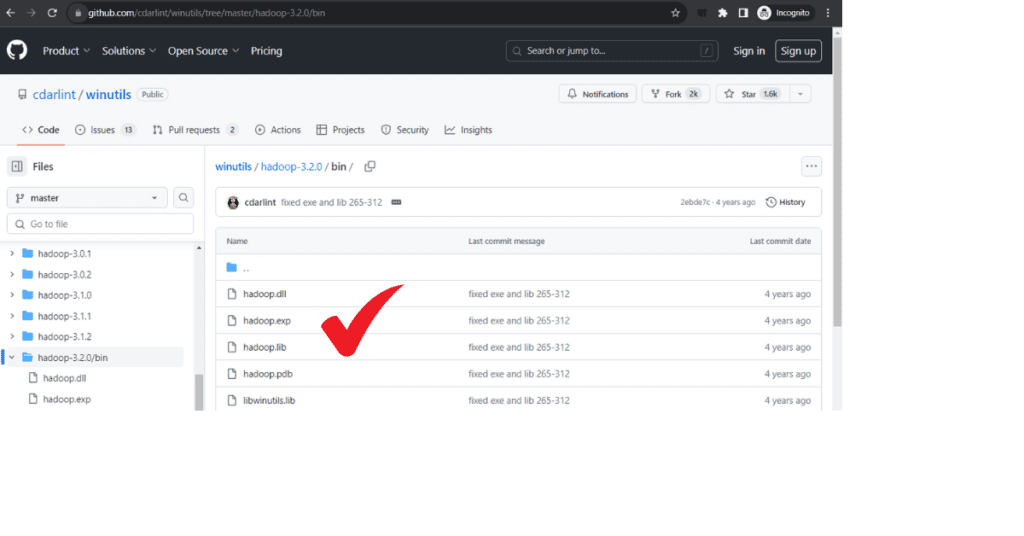
Step 2: Download winutils for Hadoop for Installing PySpark on Windows
- Download Winutils for Hadoop file from github
- Select the Hadoop version as per the version selected Step 1
- For Download Winutils for Hadoop, click hadoop.exe and download it under C:\Spark\spark-3.4.1-bin-hadoop3.2\Hadoop\bin
- Above location to be set as HADOOP_HOME

Above step is very important step of pyspark install windows. Please make sure to do it as shown in the above screenshot.
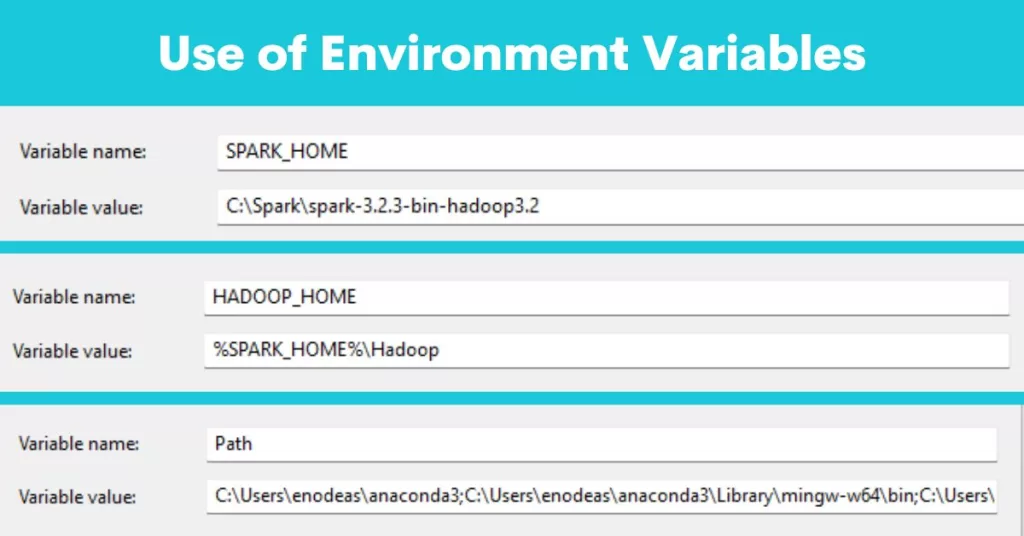
3: Use of Environment Variables for Pip Install PySpark
- Open the File Explorer
- Right Click on “This PC”
- Click on “Properties”
- Click on “Advanced system settings” on the left.
- In the System Properties window, click the “Environment Variables” button.
- Click “OK” to save the environment variables.
- Under “System variables”, click “New” and add the following variables:
- Variable name: SPARK_HOME
- Variable value: The path to the Spark folder you extracted earlier(C:\Spark\spark-3.4.1-bin-hadoop3.2).
- Variable name: HADOOP_HOME
- Variable value: The path to the Hadoop folder within the Spark directory (e.g., C:\Spark\spark-3.4.1-bin-hadoop3.2\Hadoop\bin).
- Variable name: Path
- Variable value: The path to your Python executable (e.g., c:\Users\userName\anaconda3\python.exe).

Setting of environment variables in local windows system is very important for doing pyspark install windows. Make sure you setup the environment variable correctly to install PySpark in Windows system correctly.
Step 4: Install Findspark for PySpark
Findspark is a Python library that helps locate Spark in your system. Open your command prompt or terminal and run the following command to install Findspark:
pip install findsparkStep5: pip install pyspark in Desktop
Open your command prompt or terminal and execute command (pip install pyspark). This command it will install pyspark into Python.
pip install pysparkStep 6: Verify Install PySpark
To verify that PySpark is installed correctly, open a Python environment (e.g., Jupyter Notebook or your favorite Python IDE) and run the following code:
import findspark
findspark.init()
import pysparkIf you don’t encounter any errors, congratulations! You’ve successfully installed PySpark on your Windows machine.
Test in Jupyter for PySpark Installation on Windows
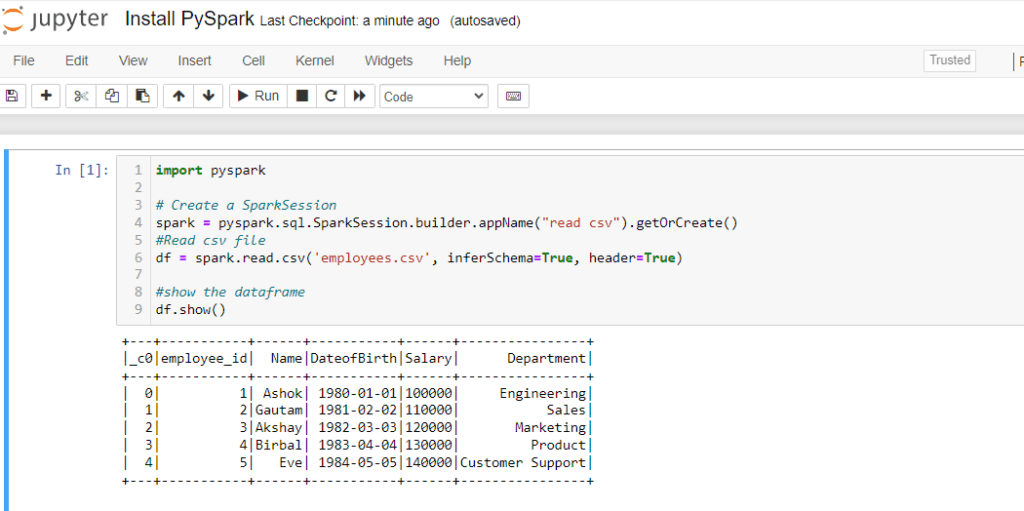
In the below PySpark code snippet you will learn to read a CSV file from PySpark. Then, read the CSV as PySpark dataframe and print(show) the dataframe. You can explore the PySpark in Python and make the data analysis easy and effortless.
import pyspark

# Create a SparkSession
spark = pyspark.sql.SparkSession.builder.appName("read csv").getOrCreate()
#Read csv file
df = spark.read.csv('employees.csv', inferSchema=True, header=True)

#show the dataframe
df.show()You successfully installed PySpark in your desktop. Now let’s understand the code:
- Import PySpark library
- Initiate the Spark Session
- Read a simple CSV file using spark.read.csv
- Spark Dataframe will contain the csv
- print the df to see the file content

Troubleshooting
- java.lang.NoClassDefFoundError: Normally this error indicates an issue with the JDK installation or the JAVA_HOME environment variable.
- FileNotFoundException winutils.exe: If you get this errors that means WinUtils is not installed or configured correctly. You need to double check the HADOOP_HOME and the winutils location.
- pyspark command not found: This means the pyspark library is not installed correctly, or the SPARK_HOME/bin is not in the path.
- Unable to load native-hadoop library for your platform… using builtin-java classes where applicable: This warning can be ignored, but it is better to resolve it by installing winutils.
Important Notes:
- Ensure that the versions of Java, Python, Spark, and WinUtils are compatible.
- Always download software from official sources to avoid security risks.
- Restart your computer after making changes to environment variables.
- If you are using Anaconda, you can install pyspark within your anaconda environment.
Conclusion: PySpark Installation on Windows
In this guide, we’ve simplified the process of installing PySpark on your Windows machine(pyspark install windows). Now you’re ready to embark on your data adventures with PySpark, harnessing its immense capabilities effortlessly. Now you can read large CSV file and much more easily with rapid speed using it’s distributed computing Architechure.
Remember, the journey of data exploration and analysis begins with a single installation step. Happy coding!


Pingback: How to Convert CSV to Parquet, JSON Format
Pingback: Spark Tutorial in Python (with Big Data, Hadoop, HDFS)
Pingback: 10 Minutes to Pandas [Python Tutorial]: A Complete Guide – Enodeas
Pingback: How to Convert Parquet to CSV: Python PySpark and More – Enodeas
Pingback: How to Read Parquet File in Python – Enodeas
Pingback: How to Read Large CSV File in Python: Best Approach – Enodeas